Tag Archives: software

Play Youtube videos directly in the VLC player and save bandwidth

VLC media player is one of the most trusted and reliable video player which supports almost any video format and seamlessly plays almost all kinds of videos and music. But, did you know that VLC can also be used for streaming, recording and watching YouTube videos. You can stream and watch videos directly inside VLC without the need of the web browser. You don’t need any flash player (most browsers need flash player) in order to play the video. Moreover, you can use all the VLC controls which you would normally use while playing an offline video such as controlling the play speed, taking screenshots and applying video effects.  The biggest benefit of using VLC is the ads free interface. The ads are absent while playing the YouTube videos from the VLC player and would not pop up in the middle of the video playback.

So, to watch YouTube videos in VLC player, do the following

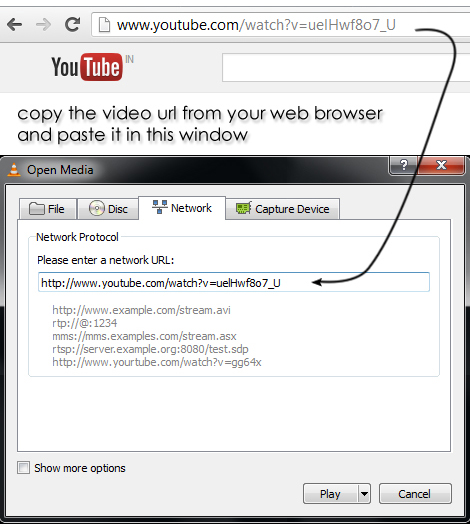
Open VLC Media Player, Go to Media and select Open Network Stream.

Now open your YouTube video in your browser and copy the video link url.

play_youtube_vlc_3gp_format

Click on Play to start the video streaming.

*Note: Use the latest and updated version of VLC player for this feature to work properly .Click the following link to download the latest version of VLC player.

download_vlc_player_latest_version

How to play the YouTube video in 3gp format?

This VLC feature can also be used to play the videos in 3gp format. This feature is of great benefit when your bandwidth limits are constrained or you are using a slow internet connection.  This would also save your bandwidth and minimize your data usage.  You can use this to watch large video files (like video documentaries and TV shows) which would normally consume a lot of bandwidth if you watch them in their normal format.

To play a video in 3gp format you would have to get its link from YouTube’s mobile(wap) site .

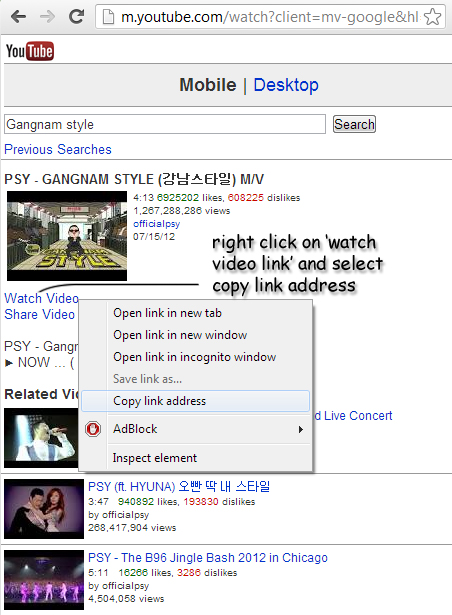
Open your web browser and enter m.youtube.com in the address bar.

Enter the name of the video in the search bar and press Search.

youtube_vlc_player_3gp

Right click on the Watch Video link and select Copy link address.

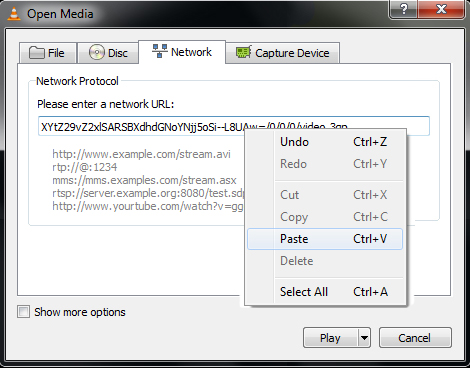
Open VLC player. Press Ctrl+N.

vlc_youtube_3gp_videos

Now paste the link in the Open Media Window and click on Play.

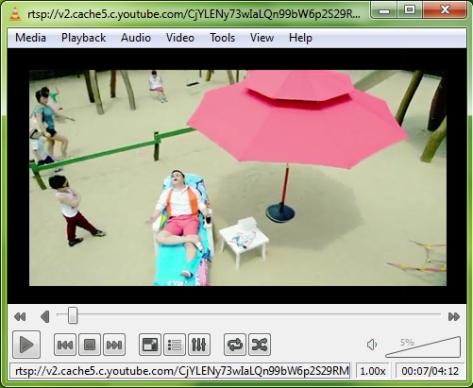
This is the screenshot of the video playing in the VLC player in 3gp fromat.

vlc_youtube_3gp_ format_new

Microsoft’s Hotmail is now Outlook.com

Microsoft has revamped the look of its primary email service Hotmail. Microsoft launched Outlook.com on Wednesday (1 August, 2012). Outlook would replace Hotmail as its free web-based email service.  Hotmail was one of the first web-based email service started by Sabeer Bhatia and Jack Smith 16 years ago in July 1996 and later acquired by Microsoft in 1997 for an estimated  $400 million. It was the most popular and world’s largest email service until it was surpassed by Google’s Gmail in June 2012.

Gmail was launched in 2004 and has 425 million active users globally. The integration of the Google services with the Android phones and the web browser Chrome helped it to increase the user base as most of the services like the android app store and the chrome extensions require a Google account. Yahoo also has a strong user base of approximately 310 million users.  Facebook recently launched its own email service which is linked to the Facebook accounts.

Therefore, this has been termed as an effort aimed at taking the increasing competitions from rivals like Gmail, Facebook and Yahoo.

The service got a tremendous response from the users and it generated 1 million new users within first 6 hours of its launch.

The longtime users of Hotmail and Msn services can continue using their old email ids but they have the option to create a new outlook.com alias for their old email accounts. They can switch to the new look by clicking “Upgrade to Outlook.com” in the Options Menu.  If you are registering for a new email account then you would get a brand new outlook.com email id (something like your_name@outlook.com).  The website is just 3 days old and the chances of getting your desired email id are high.

The new serivce has a clean interface and is well integrated with social networks like Facebook, Twitter and LinkedIn. You would receive all your social updates in one place. You can import contacts from your Facebook or other email accounts. The integration of Office tools (similar to Google Docs) would make it easier to edit documents and attachments in your inbox.

The Outlook accounts lets you login using a temporary single use password which expires after a single use which is useful when you login using public computers.

The storage limit for Outlook is unlimited. The spam or Junk email is automatically handled by the Microsoft’s Smart Screen feature. It also lets you block emails coming from a particular web address or email account and stop it from sending you any mail in the future.

The main aim of Microsoft is to recapture the growth in the webmail market, and stop losing users to its fastest growing rivals, Gmail and Yahoo. According to Microsoft, the new email service would be totally different from traditional email services with a “fresh and clean look” which was very much required after making no significant updates in Hotmail in many years.

5 iphone apps for photography

Here are some apps which would help you take some amazing pictures using your iPhone camera. These apps are loaded with preset filters and effects to make your picture look more beautiful and professional and the best part is that all of them are free to use. Here is the list.

1. Camera Awesome

This camera app has been developed by SmugMug Inc. and is one of the most downloaded apps on the Apple app Store. Unlike, Apple’s official camera app which has limited features, it offers so many options to optimize your photos and it’s free of cost. Apart from common features like Grid Overlay, image stabilization and multiple shots you can use this app to edit and control the contrast, color saturation and the sharpness of your photos. It also has presets and filters which give you more options to enhance your photos. You would realize the real potential of this application once you tap the “Awesomize” button and your photos are automatically enhanced. The One tap sharing feature allows you to share your photos on popular photo sharing websites with a single tap. The application is free but with limited features and you will have to pay to unlock all the features this app has to offer.This app was even recommended by the Wall street Journal.

“… it is by far one of the most full-powered camera apps I’ve used, and it marks an exciting advance for smartphone cameras.” – The Wall Street Journal

2. Flock

This recently launched app by Bump offers an amazing new way to share your photos.  Have you ever faced a situation, when you are out with your friends and everyone is snapping photos with their own iphone and afterwards everyone wants everyone else’s photos? Now, instead of asking them to email those photos to you (if they remember), this app will automatically do it for you.

How does it work? You and your friends would have to install this app on their phones. This app would fetch the information about you and your friends from your Facebook account and would look for photos with common metadata to find out the pictures which were taken together at a particular time. It automatically knows whom you were with on a particular date and time. It will use this data to create a shared album which would contain photos taken by you and your friends.  It lets you choose the photos which you want to share with your friends. It totally eliminates the need to send emails or explore your friend’s Facebook profile to look for those photos.

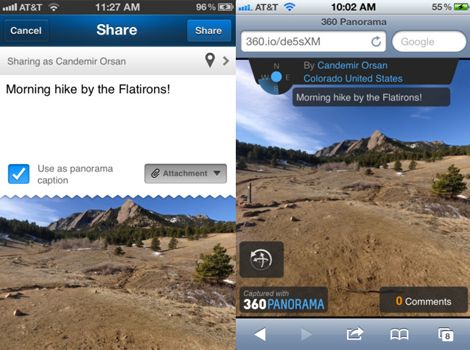
3. 360 Panorama

This app would let you take panoramic photos using your Iphone. The quality of the generated image is satisfactory.  The images are stitched in real time as you pan the camera. The images are geo tagged using info from your GPS. The images can be viewed using any computer or device. It also allows you to share the images with your friends on Facebook and social sharing websites.

4.Marble Cam

The pictures taken using this app look as if you have focused on a glass marble or a crystal ball with a macro lens. As you can see from the screenshots that the background is blurred and the scene appears upside down within the marble. The application offers 25 different types of Marbles for your images. It provides sharing options for Instagram, Twitter and Facebook.  One minor flaw is that the app uses large amounts of memory while developing the images. Therefore, it’s recommended to close the background application while taking the pictures.

5. Fuzel Pro

Tell your story through beautiful photo collages. The app comes loaded with 36 preset layouts, outlines and bases.  Choose from 30+ preset layouts and aspect ratios or you can create your own layouts. You can add effects and captions to your collage or use the custom image enhancement feature and let the app do it for you. The app lets you use images taken earlier or you can take an image using your camera. You can even import the images from your Facebook or Twitter profile. Share your collage on Facebook, Instagram, Flickr, or email.

Click on the app icon, if you wish to download it. The link will navigate to apple app store.

Install WordPress Offline on Your Own Computer i.e. Localhost

Installing WordPress on your localhost (i.e. your personal computer) has many benefits if you frequently test new themes and plugins or modify the php code or CSS of your website to change its layout and design.  Many of you must have faced this problem when you tinker with the code or the CSS and end up breaking the structure and layout of the site. You test a new theme and lose your widgets or plugins or a CSS problem arises. Sometimes, you may want to check the compatibility of some plugins before using them in your site.

Therefore, in order to avoid these problems you can install a dummy WordPress site on your local computer. There is no requirement of any web host or registering a domain name to run the website and once installed, it can be accessed offline without the need of the internet. You can post your content, install and test new themes and widgets, edit or alter the code, play with the CSS and do almost everything you do with an actual WordPress website.  This would also help you to create a backup of your online articles and content on your local computer and a way to test and preview your content before publishing it online. The content is saved locally in a database which exists on your own computer.

Installing WordPress is similar to installing any other application software on your local computer, but before installing it, you will have to prepare the platform for the local website. The platform is actually a software package which includes Apache, MySql, PHP and phpMyAdmin which are required for the website to run on your local computer. It transforms your desktop into a web server which is capable of running a website on its own.

Points to Note

A website hosted on your computer is only accessible from your local computer.  You may be able to access it from other computers in your local network but it can create some security issues.

It is not recommended to make your localhost address public for security reasons.

Making a locally hosted blog public can be counted as violation of your Internet Service Provider’s terms and conditions because you have to take their specific permission for running a web server.

You can install multiple websites on your local host.

Let’s Install WordPress but first of all we will have to install  xampp package and create a database for our local site. Follow these steps in order to do that.

Installing Xampp on Windows 32bit systems.

Download the XAMPP software package from the following link. The link will download the latest version of the software from sourceforge.net. This is the version for Windows 32 bit systems.

Extract the Zip file you just downloaded and double click the “setup_xampp.bat” file. Make sure you have the administrative privileges  (or you are logged in as administrator) before you start the installation process. Allow the exceptions in the firewall.

Choose the folder in which you wish to install the XAMPP package.

Select your desired language and continue with the installation process.

Once it is installed you can access XAMPP from Programs-> XAMPP.

Click on “Xampp-Control” in the menu to start the xampp control panel.

In the control panel you will see a list of all the installed services.

Start Apache and MySql by clicking on the “Start” button.

Now, Open your web browser and type the following without quotes “localhost/xampp”.

Select your desired language. Then you would see the following page.

If you can see this page then it means that you have successfully installed xampp software package on your system.

Installing WordPress

Now you can install WordPress on your system.  Follow these steps to install WordPress.

Download the latest version of WordPress from WordPress.org website. Click this link to visit wordpress.org and download the latest version of the wordpress CMS.

Extract the zip file in the root of your xampp installation. The root directory is the htdocs folder in your xampp installation. Simply, Go to “C:\xampp\htdocs” (or the folder where you installed the xampp package) and extract the content of the zip file in that folder.

Now Open your browser and type “http://localhost/phpmyadmin” without the quotes

Click on “Databases” Tab and enter the name of the database as “wordpress” and click on “create”.

You will see this message if the database is created successfully.

Open your web browser and navigate to “http://localhost/wordpress” and you would see this notification (shown below) asking for a configuration file.

No, this is not an error. You don’t have the database associated with your website. Just click “Create a Configuration File” button.

Read the info on the next page and click on “Let’s Go”. After clicking  “Let’s Go” you would see this next page.

Change the Database name to “wordpress” (make sure you are entering the exact name which you used at the time of database creation). Enter “root” in the username field. Leave the password field blank.  Leave the Table Prefix field as it is. Click on Submit.

This is the next page. Click on “Run the install” to start the WordPress installation process.

This is the WordPress welcome page. Enter the title of your blog/website in site tile field. Enter your desired username; it can be your name or the name of your website. Enter the password. You don’t require your email address as you are the only person who would be visiting this website. Uncheck the privacy check box. Click on “Install WordPress”.

Congratulations, you have successfully installed your blog on your local computer.

Click on login and enter the login details which you have provided earlier.

This is your dashboard. You can use it in the same way as you use your actual website or blog.

The Screenshot of the Website

Whenever, you wish to visit your site just enter this address http://localhost/wordpress/. But make sure that your xampp control panel is active and your Apache and MySql services are “Running” as you would not be able to access your website with these services disabled. Don’t forget to stop these services and exit xampp if you are no longer using your local blog.  When xampp is active it can be accessed from the system tray hidden icons. Just check your system tray to make sure you have exited xampp.

Now, you can use this blog as your normal blog but the only difference is that it is hosted on your own computer. You are free to test new themes, widgets, plugins and to make CSS changes in your blog.